
Work Orders
How to Manage Work Orders in the Pool Builder Geek Web Portal
Work Orders allow you to assign, schedule, and track service requests, warranty work, and job-related tasks from a centralized location. The Work Orders page provides powerful filtering, scheduling, and assignment tools to help your team stay organized throughout the lifecycle of each request.
Accessing Work Orders
From the left navigation menu, select:
Construction → Work Orders
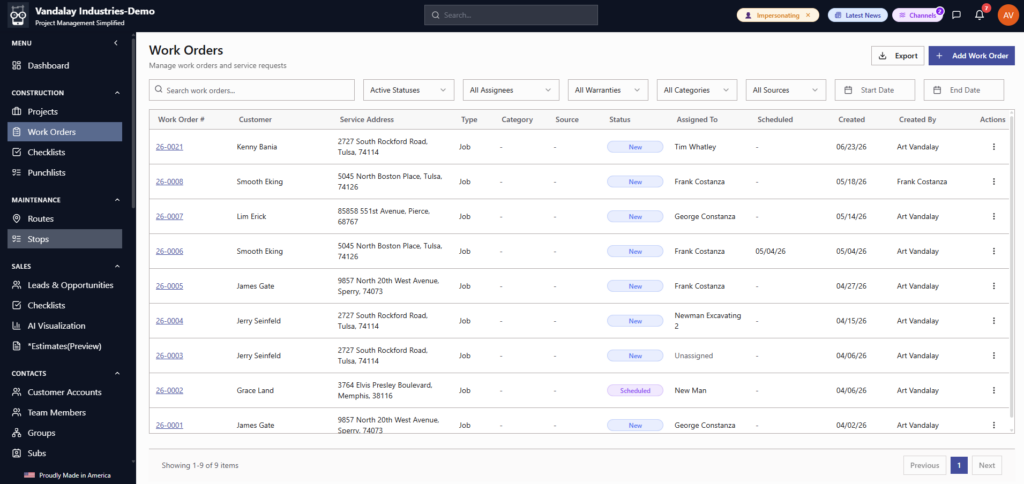
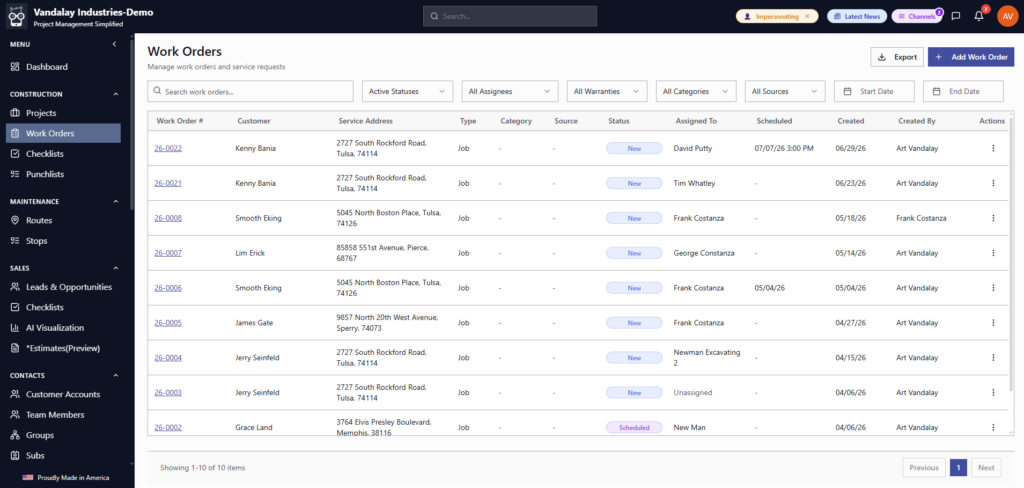
The Work Orders page displays all active and historical work orders, along with their current status, assignee, scheduled date, and other important information.
Understanding the Work Orders List
The Work Orders page provides a searchable list of all work orders.
Available Actions
- Search – Find work orders by entering keywords in the search box.
- Status Filter – Display work orders by status.
- Assignee Filter – View work orders assigned to a specific team member.
- Warranty Filter – Show warranty or non-warranty work orders.
- Category Filter – Filter by work order category.
- Source Filter – View work orders by source.
- Date Filters – Filter work orders using a start and end date.
- Export – Export the current work order list.
- Add Work Order – Create a new work order.
Work Order Columns
| Column | Description |
|---|---|
| Work Order # | Unique work order number. Click to open the work order. |
| Customer | Customer associated with the work order. |
| Service Address | Location where work will be performed. |
| Type | Job Work Order or Standard Work Order. |
| Category | Work order category. |
| Source | Origin of the work order. |
| Status | Current work order status. |
| Assigned To | Team member assigned to complete the work. |
| Scheduled | Scheduled date and time. |
| Created | Date the work order was created. |
| Created By | User who created the work order. |
| Actions | Additional work order options. |
Creating a New Work Order
Click Add Work Order in the upper-right corner of the page.
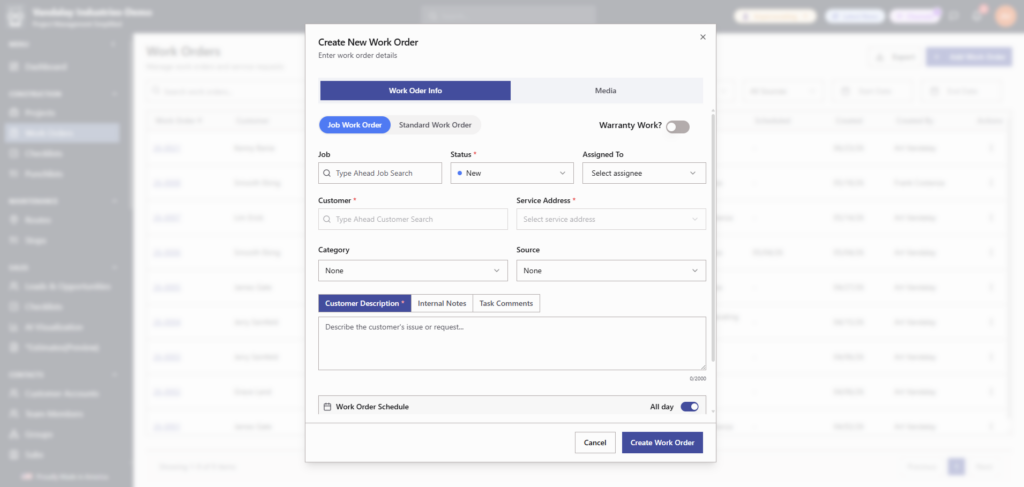
The Create New Work Order window opens.
Step 1: Select the Work Order Type
Choose one of the following:
Job Work Order
Use when the work is associated with an existing construction project.
Selecting a job automatically populates:
- Customer
- Service Address
Standard Work Order
Use for standalone service work that is not connected to a construction job.
Step 2: Complete the Work Order Information
Job
Search for an existing job using the type-ahead search.
Note: This field is available when creating a Job Work Order.
Status
Select the initial work order status.
Common statuses include:
- New
- Scheduled
- In Progress
- Completed
Assigned To
Select the employee, subcontractor, or crew responsible for completing the work.
Warranty Work
Enable the Warranty Work? toggle if the work order is related to warranty service.
Warranty work orders can later be filtered from the main Work Orders page.
Customer
Select or verify the customer associated with the work order.
For Job Work Orders, this field is automatically populated.
Service Address
Choose the location where the work will be performed.
For Job Work Orders, the service address is automatically filled in from the selected project.
Category
Assign a category to help organize work orders.
Examples may include:
- Equipment
- Plumbing
- Electrical
- Cleaning
- Startup
(Available categories depend on your organization’s configuration.)
Source
Select how the work request originated.
Examples include:
- Customer Call
- Internal Request
- Warranty
- Inspection
Step 3: Enter Work Details
Three tabs are available for documenting the work order.
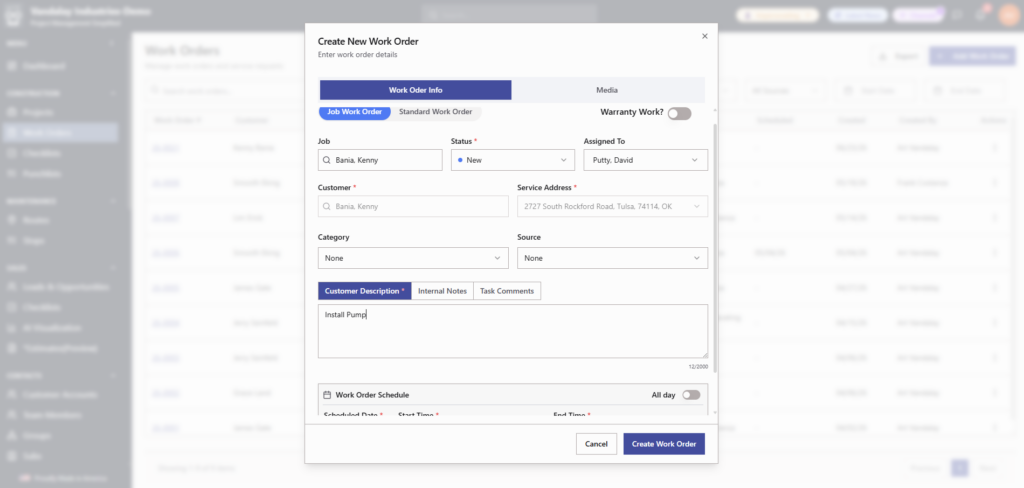
Customer Description
Required.
Describe the customer’s request or the work to be completed.
Example:
Install replacement pool pump and verify system operation.
Internal Notes
Add notes that are only visible to internal staff.
Examples include:
- Material requirements
- Technician instructions
- Access information
Task Comments
Use this section to record ongoing communication or progress updates throughout the life of the work order.
Step 4: Schedule the Work Order
Expand the Work Order Schedule section.
Depending on the type of work being scheduled, you can specify:
- Scheduled Date
- Start Time
- End Time
If the work does not require a specific time, enable the All Day toggle.
Step 5: Add Media (Optional)
Select the Media tab to attach supporting documentation.
Common attachments include:
- Photos
- Videos
- Documents
- Customer-provided images
Media helps technicians understand the work before arriving on-site.
Step 6: Save the Work Order
After completing the required fields, click Create Work Order.
The new work order is added to the Work Orders list and can immediately be assigned, scheduled, and tracked.
Managing Existing Work Orders
Open a work order by clicking its Work Order #.
Depending on your permissions, you can:
- Update the status
- Reassign the work order
- Modify the schedule
- Edit customer information
- Add notes and comments
- Upload additional media
- Complete or close the work order
Filtering Work Orders
Use the filters at the top of the page to quickly locate specific work orders.
Common filtering options include:
- Status
- Assigned Team Member
- Warranty Work
- Category
- Source
- Date Range
Filters can be combined to narrow results.
Exporting Work Orders
Click Export to download the currently displayed work orders for reporting or analysis.
The export respects any active filters applied to the list.